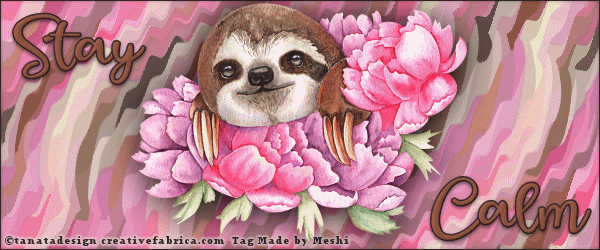
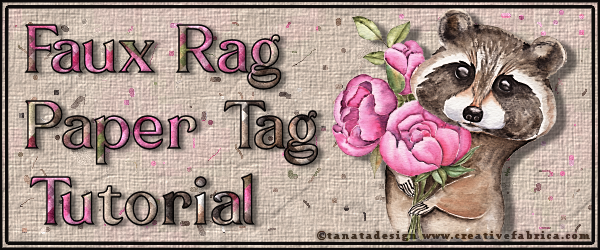
Stay Calm Tag Tutorial by Meshi

Needed:
Paint Shop Pro (I used XV).
No outside filters are needed.
Animation Shop is used if you want to animate.
An image (I used one I purchased through Creative Fabrica).
1. File > Open
Your tube
2. Window > Duplicate
(You can now close out the original.)
3. Image > Resize
Pixel Dimensions
Height 246 Pixels (Width will adjust itself)
Resample using: Weighted Average
Lock aspect ratio = Checked
Resize all layers = Checked
(Sometimes I like to crop the image first
if there is a bit of space above/below.)
4. Adjust > Sharpness > Unsharp Mask
Settings = High Res Portrait which is:
Radius: 1.00 Strength: 50 Clipping: 2
Luminance only = Unchecked
Or use any setting of your choice.
5. Layers > Duplicate
6. Image > Canvas Size
New Dimensions
Width: 600 Pixels
Height: 250
Placement = Middle box
7. Dropper Tool
Choose a light (left click on image) and a medium color
(right click on image).
8. Layers > New Raster Layer
9. Layers > Arrange > Send to Bottom
10. Flood Fill Tool
Flood Fill with one of your colors.
11. Layers Palette
Highlight your original tube (middle layer)
12. Effects > Image Effects > Seamless Tiling
Tiling method = Corner
Direction = Horizontal
Horizontal offset = 0
Transition (%) = 40
13. Effects > Image Effects > Seamless Tiling
Change Direction to Vertical.
14. Layers > Merge > Merge Down
15. Effects > Distortion Effects > Pixelate
Block width and height = 25
Symmetric = Checked
16. Effects > Geometric Effects > Skew
Skew direction = Horizontal
Skew angle = 45
Edge mode = Wrap
17. Effects > Geometric Effects > Skew
Skew direction = Vertical
18. Effects > Geometric Effects > Spherize
Strength = 80
Shape = Ellipse
19. Effects > Edge Effects > Erode
20. Layers > New Raster Layer
21. Flood Fill Tool
Flood fill with any color from your image
that you think would frame it well.
22. Selections > Select All
23. Selections > Modify > Contract
Number of pixels = 1
24. Edit > Clear
25. Selections > Modify > Contract
Number of pixels = 2
26. Layers Palette
Highlight your bottom layer.
27. Selections > Invert
28. Adjust > Blur > Gaussian Blur
Radius = 2
29. Selections > Select None
30. Palette Layers
Highlight your middle frame layer.
31. Effects > 3D Effects > Drop Shadow
Vertical and Horizontal = 0
Opacity =50
Blur = 5
32. Palette Layers
Highlight your top layer.
33. Effects > 3D Effects > Drop Shadow
You can choose your own or use mine:
Vertical offset = 2
Horizontal = 0
Opacity = 90
Blur = 45
Color = Black
34. Text Tool
I used Sweet Shine from dafont.com, and
changed the colors to what looked best.
Size 9
Units: Points
Bold
Align Center
First Direction
Sharp
Stroke Width 1.5
35. Effects > 3D Effects > Inner Bevel
Click on the Default Arrow and then change:
Bevel: 2
Depth: 1
36. Effects > 3D Effects > Drop Shadow
Change Opacity to 50 and Blur to 5.
37. Add your copyright information on a new layer.
38. File > Save As
I like to save as png for the clearest image.
You can save as jpg if you'd like less kbs.
You are done with the making of your tag.
However, if you would like to animate:
1. Layers Palette
Highlight your bottom layer.
2. Edit > Copy
3. In Animation Shop
Edit > Paste > As New Animation
4. Effects > Insert Image Effect
Effect: Wave
5. Click on F:1 and hit delete on your keyboard four times,
making sure to click on the first frame before each delete.
You should have seven frames still.
6. Edit > Select All
7. Edit > Copy
8. Animation > Reverse Frames
9. Click on Frame Seven.
10. Edit > Paste > After Current Frame
11. Click on Propagate Paste at the top of AS (looks like three folded edged pages).
12. Back in PSP close off background layer in Layers Palette.
13. Edit > Copy Special > Copy Merged
14. In Animation Shop
Edit > Paste > As New Animation
15. Edit > Copy
16. Highlight your animated image and
Edit > Select All but have Frame one in site.
17. Edit > Paste > Into Selected Frame
Make sure everything lines up and left click.
Every frame should have your full tag now.
18. File > Optimization Wizard
Both Animated GIF File and Replace the current animation with the optimized version selected
Next
Better Image Quality bar should be at the top.
Click on Customize
Number of Colors: 255 colors
Create palette by Optimized Octree selected
Reduce colors by Error Diffusion selected
Click on Optimizations tab
Write Minimal Frames checked
Map Identical pixels to Transparent checked
OK
Use these settings when saving unoptimized files should be checked
Click Next three times and then finish
19. View > Animation
20. File > Save As
Name your tag
Save as type: CompuServe Graphics Interchange (*.gif).
--------------------------------------------------------------------------------
This Tutorial was Made by Meshi September 20, 2021
I'd love to see your results. :)

Comments
Post a Comment